 +91 98193 84820
 girish.gemerik@gmail.com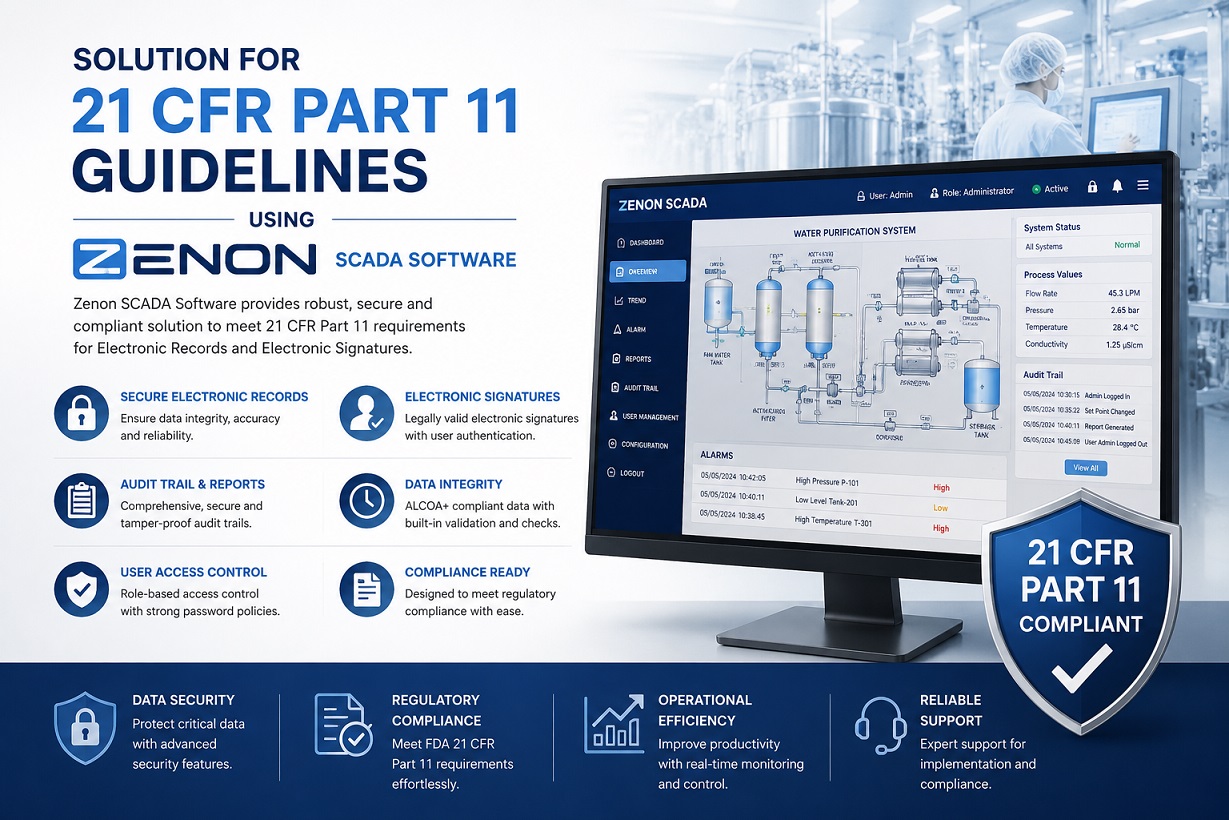
SOLUTION FOR 21 CFR PART 11 GUIDELINES USING ZENON SCADA SOFTWARE
- ZENON is a Supervisory Control and Data Acquisition (SCADA) software.
- It is used for data acquisition, process visualization, and process control (e.g., by means of control recipes) as well as for process documentation.
- The physical control (valve switching, control loops, sequences) is always performed in the PLC, and ZENON is connected to the process equipment via Ethernet to the PLC.
HARDWARE SPECIFICATION
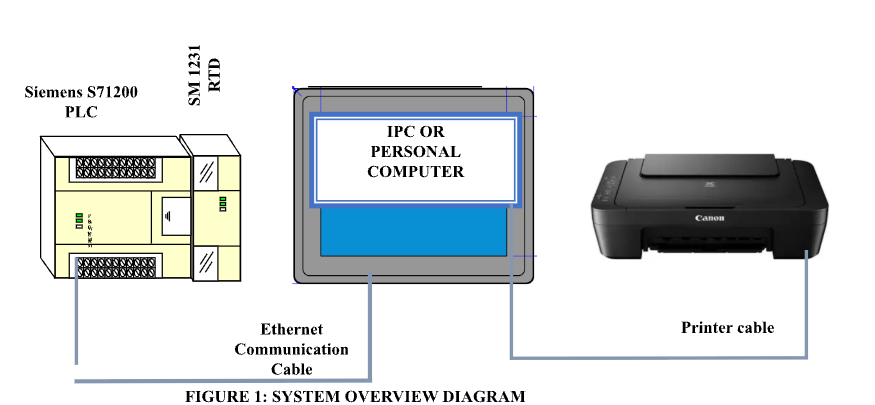
The communication between PLC and IPC is based on the TCP/IP protocol Ethernet port is provided on the PLC and IPC and ethernet cable is used for communication[cite: 1]. A printer can be connected optionally to the ZENON SCADA by printer.
ZENON SCADA SOFTWARE FEATURES
The Zenon software provides access to users for machine configuration in terms of changing the process values, controller setpoints, measurement ranges and decimal places[cite: 1]. Process values and controller setpoints are acquired on-line from the Machine[cite: 1]. Double Door autoclave shall have the following Zenon SCADA software facility.
| Sr. No. | Compliance Description / Requirement | Yes (√) / No (×) |
|---|---|---|
| 1. | Password policy | |
| 1.1. | System shall have a security mechanism that uses at least two distinct identification components (e.g. User ID/ password) to restrict access to authorized individual persons. | √ |
| 1.2. | The system shall provide the ability to create a new individual specific user ID so that only authorized users should be able to access the system based upon various privileges defined for the user. | √ |
| 1.3. | The system shall allow system administrator to change the user status (Deactivation/ Disable/lock and Enable/Unlock/ Reactivate). | √ |
| 1.4. | The system shall lock / auto logout the user session if the devices are unattended for more than a defined time (Preferably 02 minutes). | √ |
| 1.5. | The system shall lock the User IDs after defined unsuccessful login attempts (Preferably maximum 5 wrong attempts). | √ |
| 1.6. | The system shall allow to set the password length. (Preferably minimum of eight characters along with combination of number, capital letters, and special characters (such as $, &, and/or #). | √ |
| 1.7. | The system shall mask password entry. | √ |
| 1.8. | The system shall force new users to change their initial password at first time login. | √ |
| 1.9. | The system shall permit users to change their own password as and when required. | √ |
| 1.10. | System shall force the user to change the password after a defined frequency. (Preferably every 60 days). | √ |
| 1.11. | System shall show a warning message before password expires. | √ |
| 1.12. | The system shall only permit the System Administrator to reset a password. | √ |
| 2. | User management system & Privileges | |
| 2.1. | The system shall allow to create unique user names. | √ |
| 2.2. | The system supports the minimum following user roles: <Operator>, <Supervisor>, <Manager>, <Admin> | √ |
| 2.3. | The system shall provide capability for the configuration of different access privileges for the different type of user groups to ensure that personnel have access only to functionality that is appropriate for their job role, and that actions are attributable to a specific individual. | √ |
| 3. | Electronic Data & Storage | |
| 3.1. | System shall be able to generate accurate and complete copy of electronic data, records and report in human readable non-editable formats and suitable for inspection and review. | √ |
| 3.2. | System shall not allow any user to delete or edit the e- records through the application. | √ |
| 3.3. | System generated electronic data shall be in encrypted form only. | √ |
| 3.4. | System shall allow to export and print e- records to human readable non-editable formats e.g. Common/global XML standards, ANDI, PDF or SGML format. | √ |
| 3.5. | Print date and time and printed by shall be captured on the print report (i.e. phase, batch, alarm with required details). | √ |
| 3.6. | Progressive number of cycle or batch should reflect in batch or cycle report. | √ |
| 3.7. | The system shall allow recovery/restore functions for generated electronic data along with audit trail data. | √ |
| 3.8. | The system shall support the acquisition of date and time from Client server. | √ |
| 3.9. | System shall allow users to view/display the e-records through the application. | √ |
| 3.10. | While changing parameter values (Recipe) SCADA system will ask for E-signature it will includes User & password with comments. | √ |
| 3.11. | While Batch report approval it will be restricted to authorized user(optional). | √ |
| 3.12. | Each process of electronic signature will be electronically logged in audit trail with time and date stamp and user ID. | √ |
| 3.13. | Generated data shall be store in protected drive. | √ |
| 3.14. | User shall not be able to save or relocate the result files, it should be controlled through software only. | √ |
| 3.15. | User shall not have rights to create folders or project in software these rights shall be with administrator. | √ |
| 3.16. | System shall be compatible with Trend Micro antivirus software. | √ |
| 4. | Audit Trail | |
| 4.1. | The system audit trail shall track the creation, modification, and deletion of records, ensuring changes do not obscure previously recorded information. | √ |
| 4.2. | All activity shall be logged between login and log out with time and date stamp along with user details. | √ |
| 4.3. | The audit trail shall be searchable, transferable electronically and printable in human readable format. | √ |
| 4.4. | The system shall keep a log of fail attempts to access the system. | √ |
| 4.5. | User’s login and logout details shall be recorded in the audit trail. | √ |
| 4.6. | The audit trail shall be protected from any modification / deletion. | √ |
| 4.7. | The audit trail generation shall be outside the control of and access of all users as well as system administrators. | √ |
| 4.8. | The audit trail shall always be “on”, entries should be recorded automatically when a transaction occurs. | √ |
| 4.9. | All hardware related errors and warning shall be logged in audit trail (System audit trail). | √ |
| 4.10. | Time and date stamp change automatically, it shall be locked and not editable unless performed by authorized user. | √ |
| 4.11. | System shall prevent to modify or delete audit trail. | √ |
| 4.12. | Audit trail documentation shall be retained for a period at least as long as required for subject electronic records. | √ |
| 5. | Data Backup & Restore | |
| 5.1. | Software shall have facility for auto data back-up to any client or connected central server. | √ |
| 5.2. | Backup files shall be non-editable. | √ |
| 5.3. | Data backup required both manually as well as automatically. | √ |
| 5.4. | The system shall support the acquisition of date and time from Client server. | √ |
| 5.5. | The system shall support regular backups of all electronic data. | √ |
| 5.6. | The system shall have the ability to restore complete and accurate records from backed data while preserving integrity. | √ |
| 6. | Power failure / recovery | |
| 6.1. | Automatic recovery of the machine after the event of power failure. | √ |
| 6.2. | There is no any data loss observed for saved data. | √ |
| 7. | Online Report Monitoring Facility | |
| 7.1. | Software shall have facility for online data monitoring during running process on SCADA screen and same data shall be capture for Offline printing data from SCADA. | √ |
| 8. | Alarm and Alarm History provision | |
| 8.1. | SCADA shall be capable of logging alarm and alarm history of same time stamp with history review and report form (by date, time, user, etc.). | √ |
ZENON WELCOME SCREEN NAVIGATION
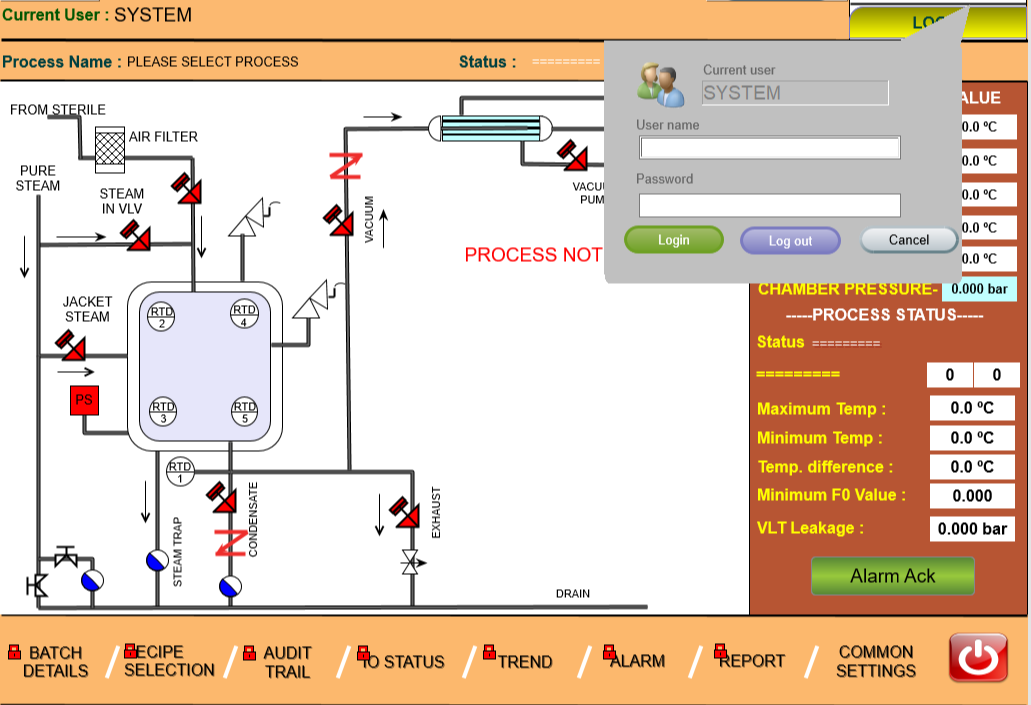
- When power is ON, the IPC panel first home screen shall be displayed as below.
- On the screen, a small user-friendly digital keyboard will always appear when the user wishes to login or change the values of the system.
- Enter the user ID and password in the blank space and press the login button.
- After a successful login, the system will prompt the user to change the password for the first time as per the password management policy.
USER MANAGEMENT
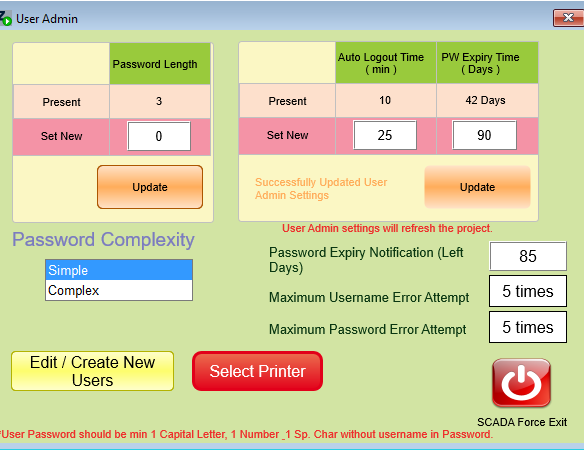
- The above screen shows user management for creating or editing a new user or group.
- Configure the password length and password complexity requirements for user IDs.
- Set the auto logout time and password expiry time for user IDs.
- Configure notifications regarding password expiry for user IDs.
- Set the maximum number of allowed invalid login attempts for a user ID.
- Set the maximum number of invalid password attempts permitted during login.
- Select and configure the desired printer option.
- An Update button is provided to save changes to the parameters.
- A SCADA force Exit button is provided in case the Zenon welcome screen freezes or experiences any other bug issue.
BATCH DETAILS
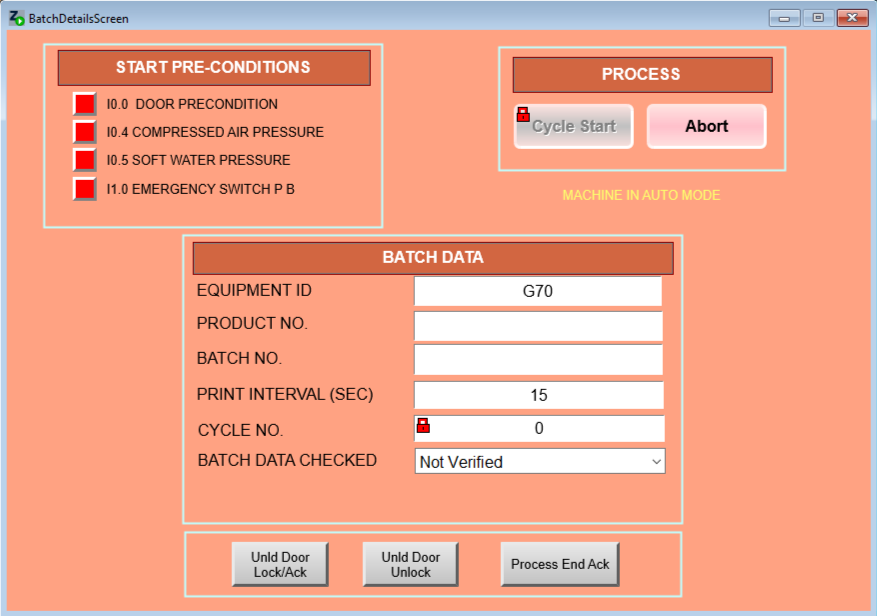
- Before starting the process, check the pre-condition ok status of the machine.
- Enter the Batch details for the selected cycle.
- Enter the print interval time in seconds to print the data at a particular time interval.
- After entering all the batch data, select Batch Data Checked as Verified in the drop-down menu.
- Once the data is verified, the “CYCLE START” button is unlocked to start the cycle.
- Machine in AUTO MODE is displayed to ensure it is not running in manual mode in the background.
- The “ABORT” button is provided to abort the cycle at any given point of time.
- The Process End Ack button is provided in case the process end popup button is not visible.
RECIPE SLECTION
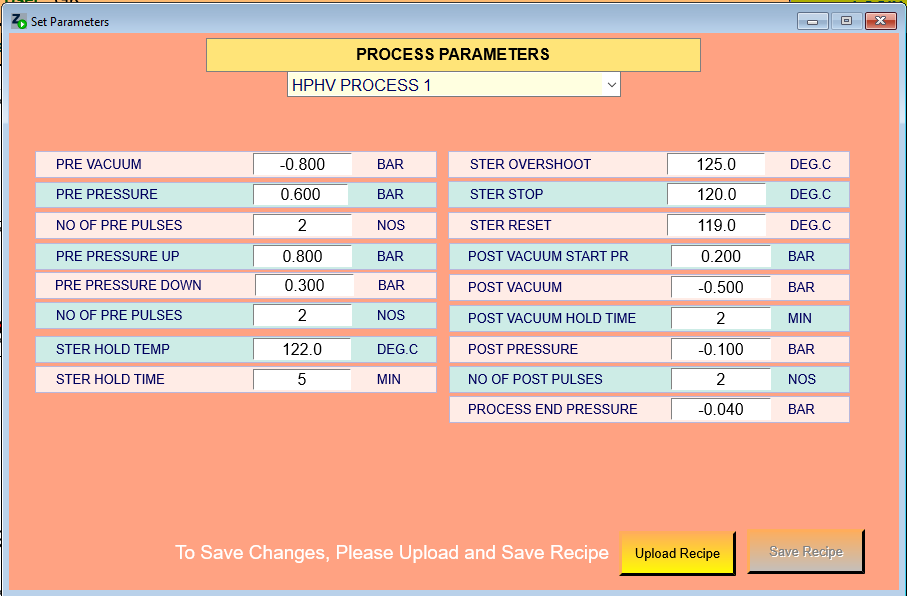
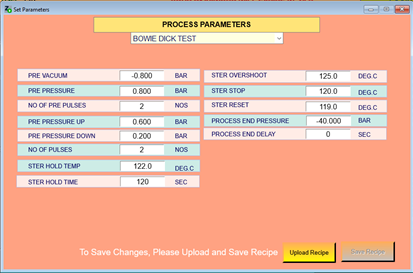
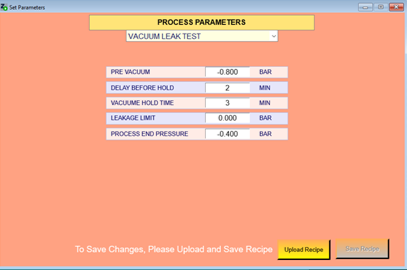
- Touch the ‘RECIPE SELECTION’ tab on screen, click on the drop-down menu at the center of the screen, and press any one of the cycles displayed. Once the desired process is selected, a new screen will appear to enter the set points of that cycle.
- To change the values, click on the respective entry name.
- Enter the details as per the manufacturer’s recommendation or client set SOP and enter all the values / check the values.
- The system prompts for electronic signatures—including user credentials and comments—whenever critical recipe parameters or setpoints are modified.
- Pre-programmed safety limits and validation boundaries prevent operators from entering out-of-range setpoints that violate validated parameters.
- Every modification made to a recipe configuration is automatically recorded in the secure system audit trail with a date, time stamp, and user ID.
- Once all cycle parameters are verified and saved, the configuration is locked to prevent unauthorized changes during active production runs.
- Authorized supervisors or administrators can approve, store, or recall pre-saved recipes to ensure batch-to-batch consistency and repeatability.
- The system verifies recipe compatibility against the current machine status and pre-conditions before allowing the cycle parameters to be loaded.
ONLINE AUDIT TRAIL VIEW
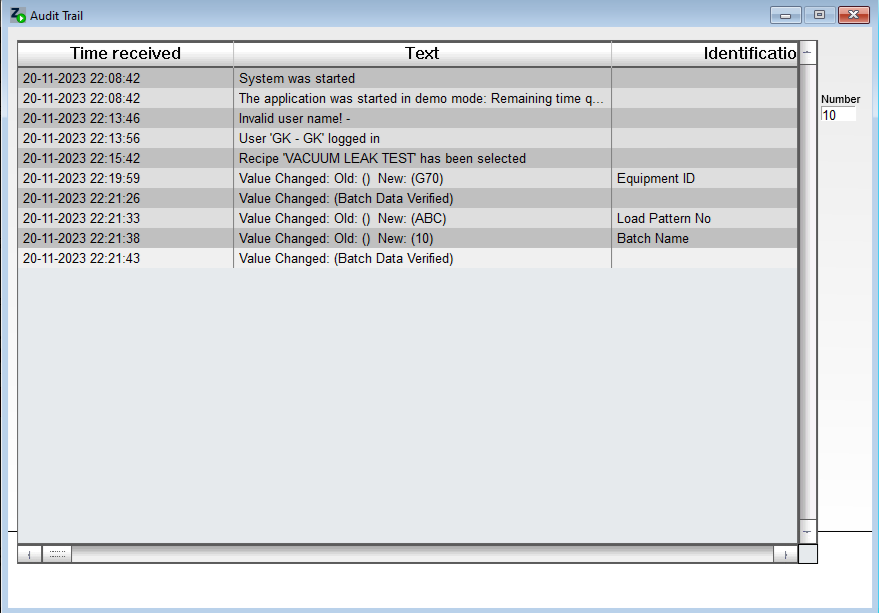
- This window will show the current Audit trail from the start of the system to shutdown.
- Audit trail data will be stored in a non-editable format.
- Audit trail data is available for review in a human-readable form.
- The system will not allow the user to disable the audit trail once the equipment/machine is started.
- The user can sort audit trail view data by time, text, identification, or user-wise.
- The number of entries will be displayed on the top right-hand side of the window.
- Any change in the set point of a selected recipe will appear in the audit trail.
I/O STATUS SCREEN
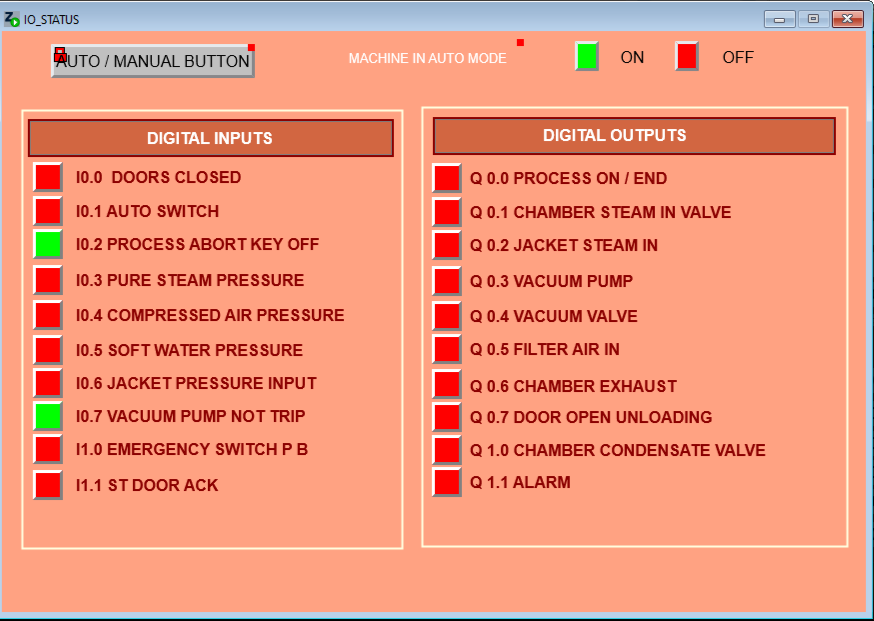
- The digital input & Output screen will show the health of the system.
ONLINE ALARM VIEW
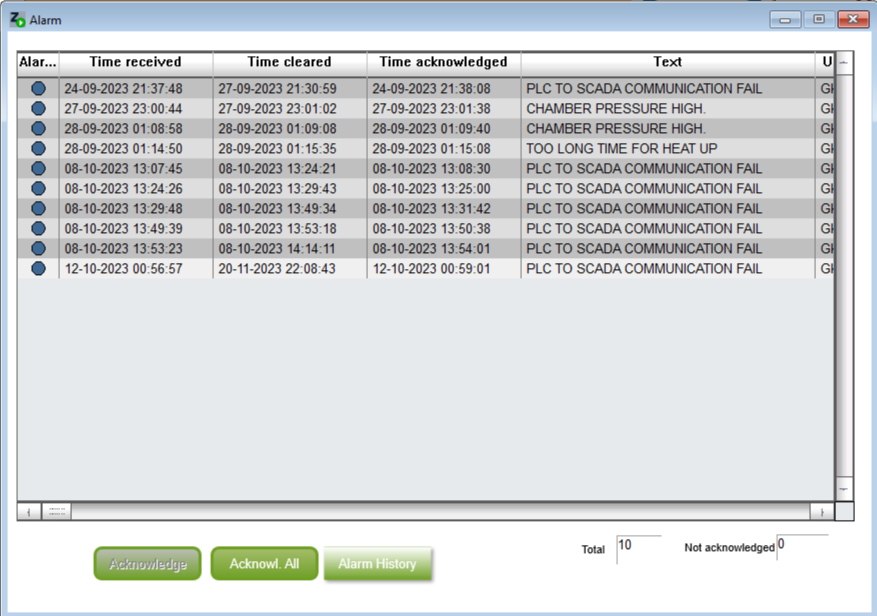
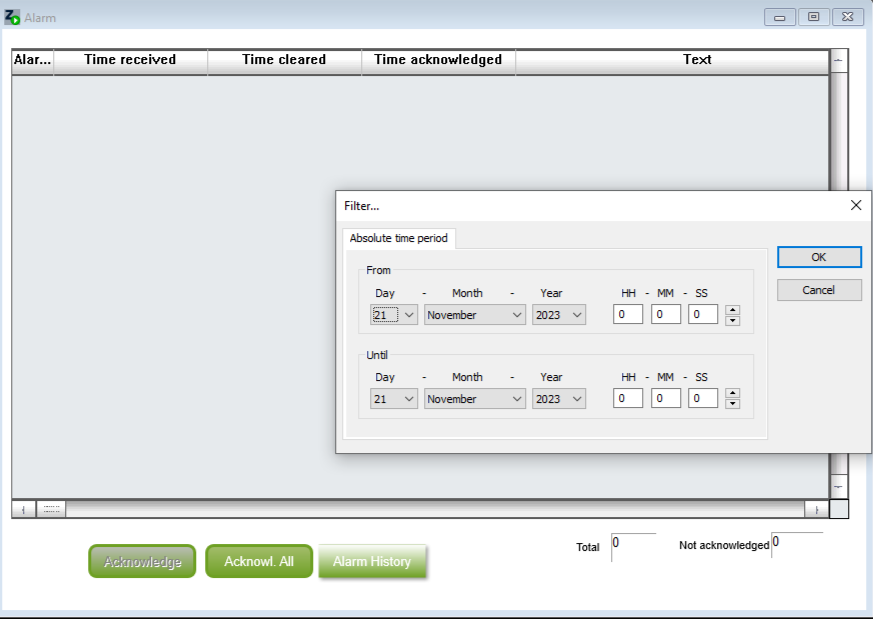
- The Alarm history button on touch will show all the alarms generated which can be viewed as per date/time filter.
- Online Alarms can be viewed by touching the ALARM button in the footer plate, where all alarms are stored and the operator is informed by Alarm status, Time received, Time Cleared, Time Acknowledged, Text, and User – Full name during the running cycle condition.
- The screen shot shows the current running alarms which can be individually acknowledged and/or can be acknowledged altogether.
REPORT
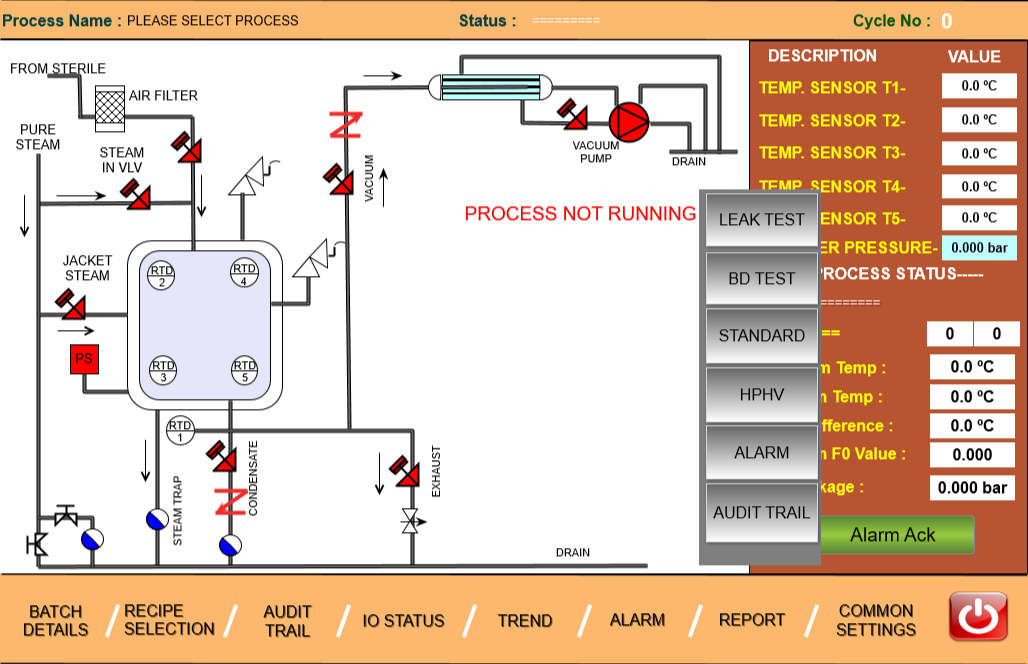
- Click on the desired button to generate reports for the following:
Audit Trail report, Alarm report, HPHV Cycle report, Bowie Dick Cycle report, Leak test report - Selected Cycle report print can be taken by clicking on the print tab located at the right corner.
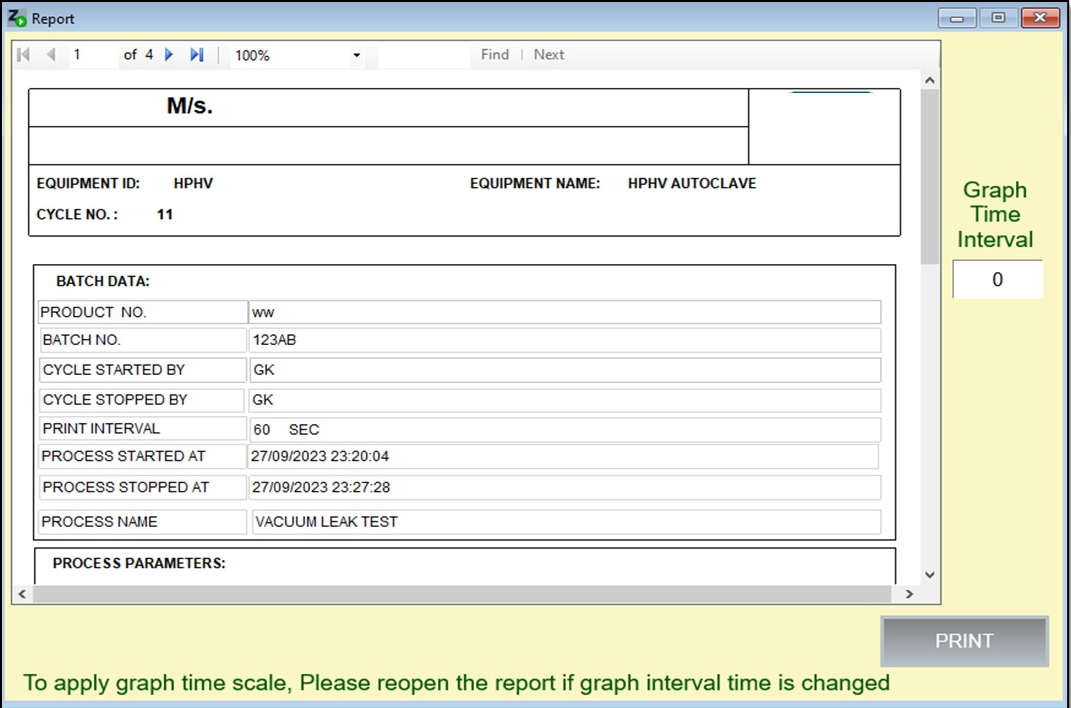
- The Report screen consists of the Header, Data, Footer, and trends of the selected process. The report screen button navigates the report generation screen for printing.
- All generated reports are formatted in a secure, human-readable, and non-editable layout to satisfy electronic record compliance requirements.
- Historical batch data and time-stamped trends can be queried easily by selecting specific date ranges or batch numbers.
- Exported records automatically record the printer identity, user ID, and print timestamp directly on the footer of the documentation for full tractability.
AUDIT TRAIL LOGS / REPORT
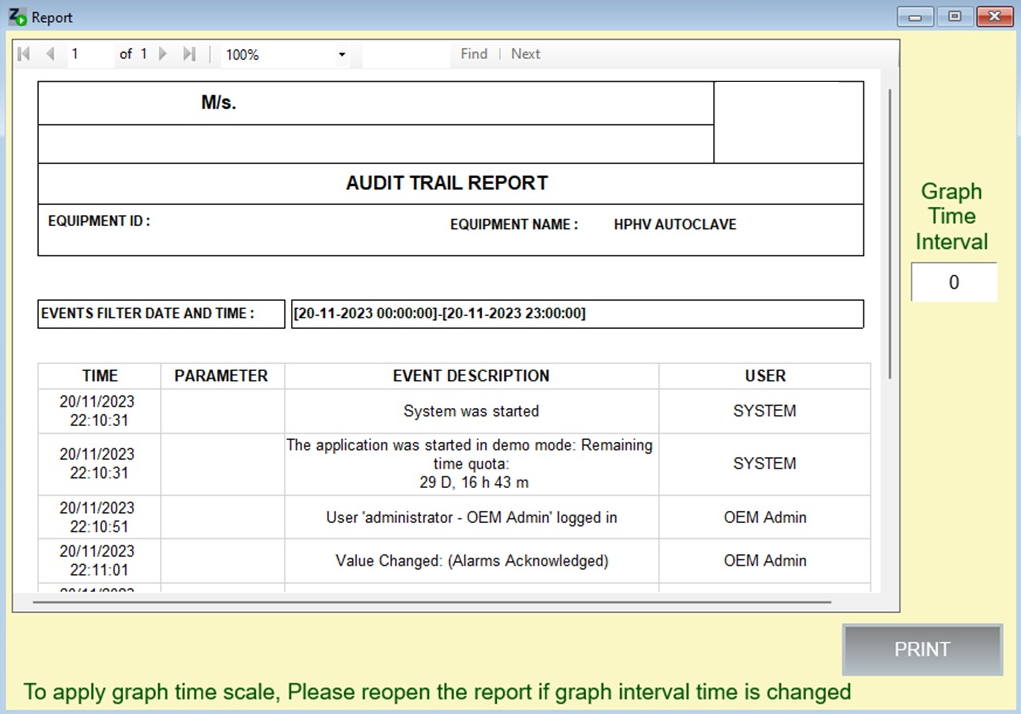
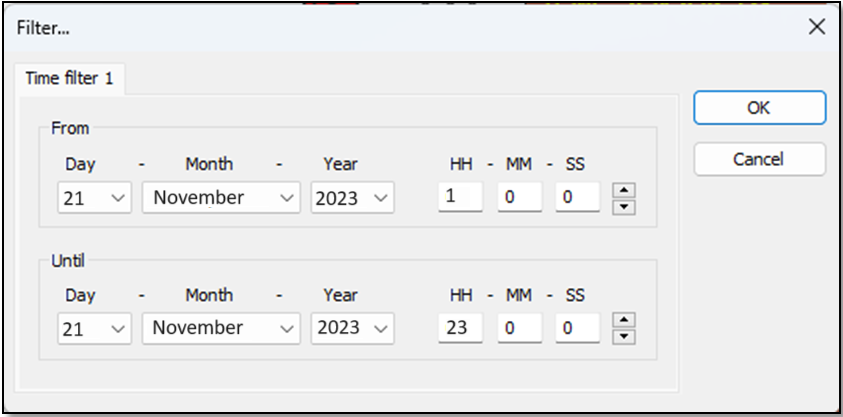
- Audit Trail reports can be printed or viewed through a time filter as shown below.
- Select the desired date and time to generate the Audit Trail report, and ensure minimum logs are reported in the audit trials.
- Logs include User Login / log out, Password change information, and Batch Start & End events.
- System events are tracked, including Communication Fail (PLC & SCADA), User Creation, deactivation/activation & unlock, and Changes in user access level (note that it will not indicate old and new user levels, and group assignment to user details is not logged due to software limitations).
- Security monitoring covers unauthorized access attempts, Auto Data backup parameters setting (Date & Days), SCADA Software Stop, SCADA Software Start, and Auto log out.
- Changes in set parameters (Recipe) will reflect in the audit trail with their old and new values, and required comments will appear in a dialog box with a comment option.
- Report Approval details are logged, recording the User, date, and time alongside Alarm Acknowledgment.
- Changes in Batch Data Parameters are fully captured for auditing purposes.
- Password complexity parameters are tracked, including Password length, Auto log out time, Password expiry days, Password complexity selection, and Password warning notification changes.
- Additional logged events include Batch data verified selection and Button Operations such as Batch start, Stop, Process end Ack., and Door Operation Buttons.
ALARM REPORT
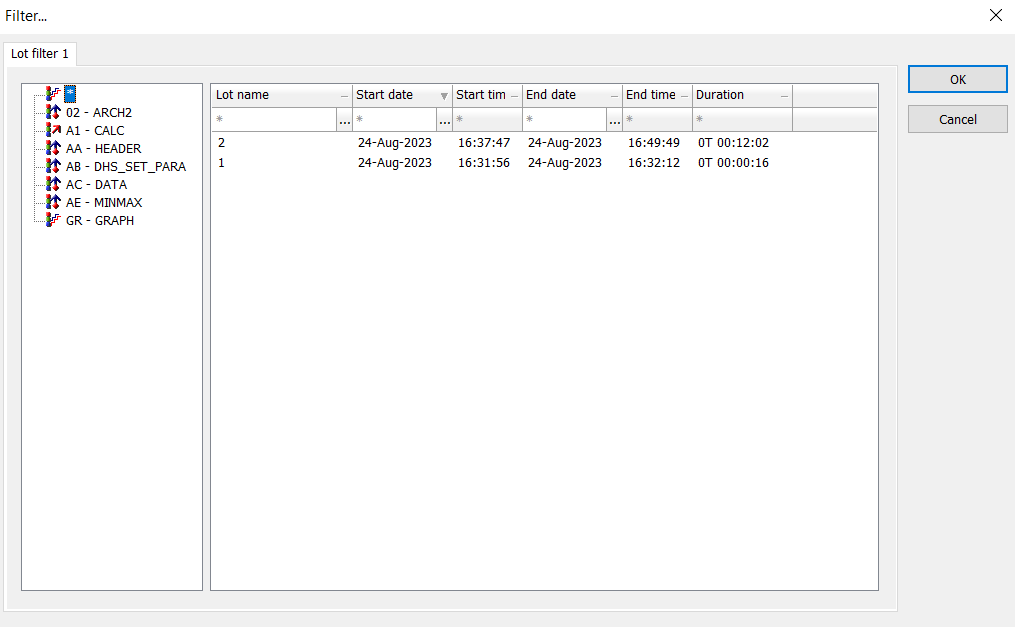
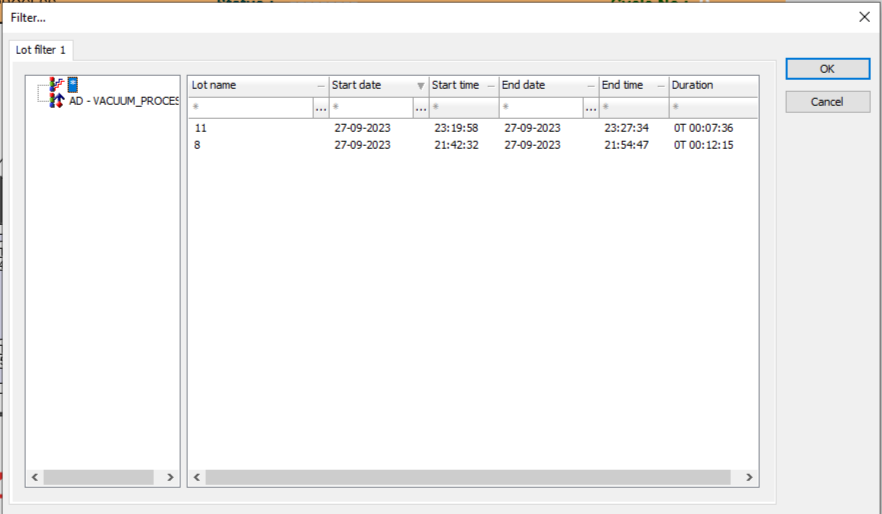
- The columns from left to right of the main window include: Lot No., Start Date (of the selected process), End Date (of the selected process), End Time (of the process), and Duration (of the process).
- After clicking on the Report button then alarm, the following window opens.
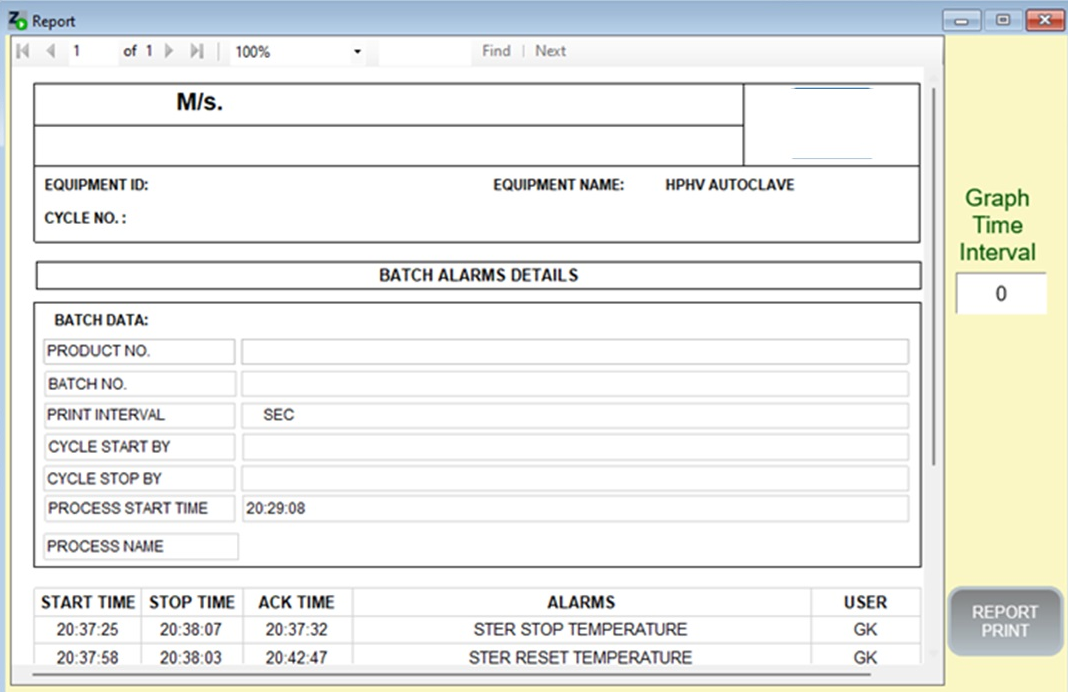
- The front window allows filtering the required report out of the lot for which you want the report to be generated; upon selection of a particular report, the report screen from the process filter selected is displayed as shown in the second background screen.
- The Alarm report screen shows the report of the alarm with the value of trend intervals and an option to print.
DATA BACKUP
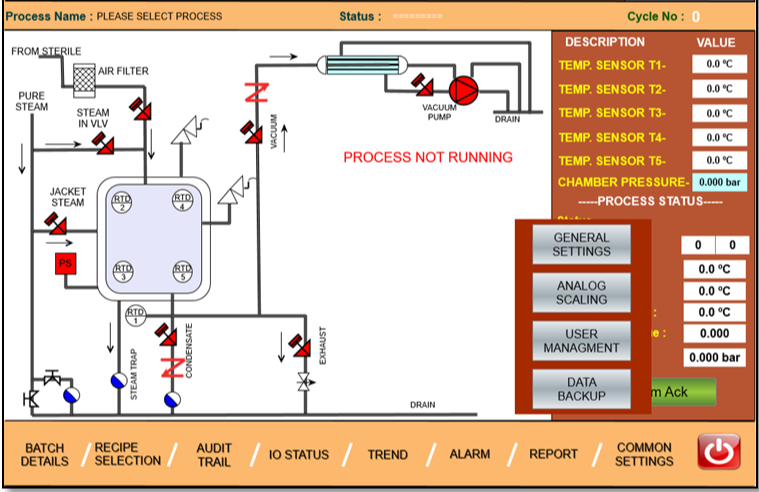
- By clicking on the Common settings tab, it will show Data Backup, user management, Analog scaling, and General Settings.
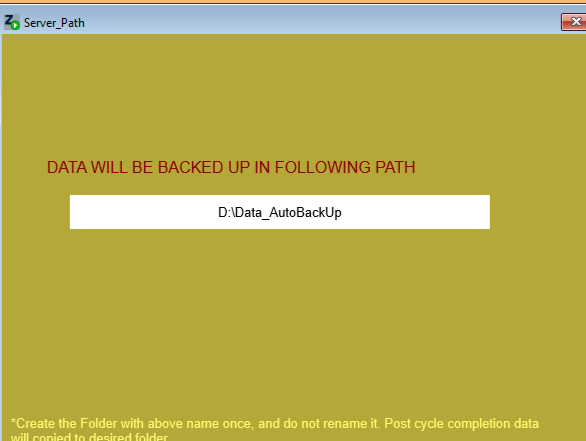
- Click on the DATA BACKUP button to show the data backup path.
- Backup Data will be stored in the D drive in the following path
D:\Data_AutoBackUpby default - Create the folder with the above name once and do not rename it.
- Post cycle completion, the backup data will be dumped in the desired folder.
- The file type of generated backup is in non-readable formats such as .ARX, .BIN, .ARS, .AML, .CEL, etc
- The auto backup data can be copied to the desired selected server path by the client.
- Data transfer can be done by FTP software daily or weekly.
- The user has to copy files from the Zenon data folder to the location (path) where data backup is done.
- The SCADA system can store electronic data automatically at the desired path i.e., Server (ensure availability of a proper server connection and software); in case of no server connection available, data can be taken on available drives on IPC i.e., C or D Drive.
DATA RESTORE PROCEDURE
- In case of data loss from IPC or power failure, copy files from the server Auto data backup folder into the instrument's
D:\Zenon_datafolder path - Make sure your data restoration activity is carried out on the same IPC.
EXIT OR SHUTDOWN OPTION
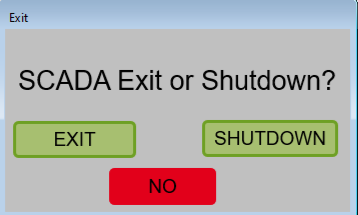
- To EXIT or shutdown from SCADA, click on the power tab located at the right corner on the display, and the above screen will be displayed.
- If you want to exit from the software, click on the EXIT tab.
- If you want to shut down the IPC, then click on the SHUTDOWN tab.
USER ACCESS PRIVILEGES FOR SCADA
- The user level based on functionality and authority is defined. For e.g. manager, Administrator, operator, supervisor. Responsibility and task wise privileges are defined.
- Note: Each user should have the right to reset his/her own password. Only in case of the new Account creation, activating a locked account (incase account is locked after unsuccessful attempt of login) then admin can reset the same.
| Privileges | Description | User Level / User Group | |||
|---|---|---|---|---|---|
| Operator (Level 1) |
Supervisor (Level 2) |
Manager (Level 3) |
Admin (Level 4) |
||
| System | To access the home screen | Yes | Yes | Yes | Yes |
| Batch Details | To fill the batch details of cycle | Yes | Yes | Yes | Yes |
| Cycle Start | To start the cycle | Yes | Yes | Yes | Yes |
| Cycle Abort | To abort the cycle | Yes | Yes | Yes | Yes |
| Equipment ID | To update equipment ID | No | No | Yes | Yes |
| Product Number | To update the product no. | Yes | Yes | Yes | Yes |
| Batch Number | To update batch no. | Yes | Yes | Yes | Yes |
| Print Interval | To change and update print interval | No | Yes | Yes | Yes |
| Unload Door Lock/ACK | To lock and acknowledge of unloading side door | No | Yes | Yes | Yes |
| Unload Door Unlock | To unlock the unloading side door | No | Yes | Yes | Yes |
| Recipe Selection | To selection of respective recipe | Yes | Yes | Yes | Yes |
| Set Process Parameters | To set and change the process parameters | No | Yes | Yes | Yes |
| Audit Trail Button | To access the audit trails | No | Yes | Yes | Yes |
| Report | To access the machine generated reports | Yes | Yes | Yes | Yes |
| Batch Reports | To access the batch report | Yes | Yes | Yes | Yes |
| Batch Alarm Report | To access alarm report of system | Yes | Yes | Yes | Yes |
| Audit Report | To review and verification of the audit trail | Yes | Yes | Yes | Yes |
| General Settings | To set non critical parameters of process | No | No | No | Yes |
| Analog Scaling | To adjustment of analog process scaling | No | No | No | Yes |
| User Management | To management of the system user | No | No | No | Yes |
| Data Backup | Take back up and access of system | No | No | No | Yes |
| SCADA Exit | To Exit the SCADA system to windows | No | No | No | Yes |
| System Shutdown | To shut down the IPC system | No | No | No | Yes |
| IO Status | To view the input and output status of the system. | Yes | Yes | Yes | Yes |
| Trend | To view the graphical Trend of the system. | Yes | Yes | Yes | Yes |
| Alarm | To view the current Alarm status of the running process. | Yes | Yes | Yes | Yes |
| Alarm History | To view the Alarm history of the system. | Yes | Yes | Yes | Yes |
| Auto / Manual Button | Option to operate the machine in auto or manual mode. | No | Yes | Yes | Yes |